Connecting Your Shopify Store to Vervante
Route your Shopify orders to us automatically for printing and fulfillment.
Once your store is connected, marking an order as fulfilled in Shopify sends the order details straight to us. We print and ship it, and you never have to forward anything by hand. Setup takes four steps.
Step 1: Add Vervante as a Fulfillment Service
- From your Shopify admin, go to Settings > Shipping and delivery.
- In the Custom order fulfillment section, click Add fulfillment service.
- In the form, enter the fulfillment provider title as Vervante and the fulfillment provider email as orders@orders.vervante.com.
- Click Save.
From now on, when you mark an item or a complete order as fulfilled in Shopify, an email with the full order information is sent to us so we can fulfill it for you. Step 3 sets up that email so our system can read it.
Step 2: Assign Your Products to Vervante
- From your store's Products page, select a product you want us to fulfill.
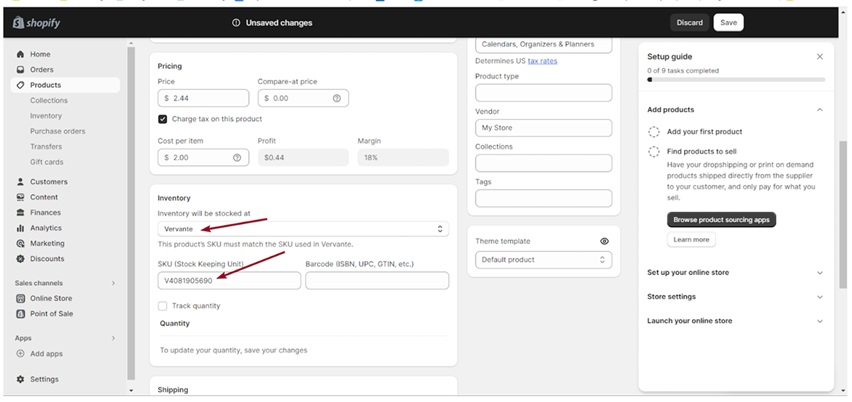
- In the Inventory section, open the Inventory will be stocked at drop down and choose Vervante.
- Click Save.
If Vervante does not appear in the drop down, return to Step 1 and confirm the fulfillment service was saved. Also check that the SKU field holds a valid Vervante part number. If it does not, review your product file.
Step 3: Update the Fulfillment Email Template
Our system reads a specific email format, so you will replace Shopify's default fulfillment request template with the code below.
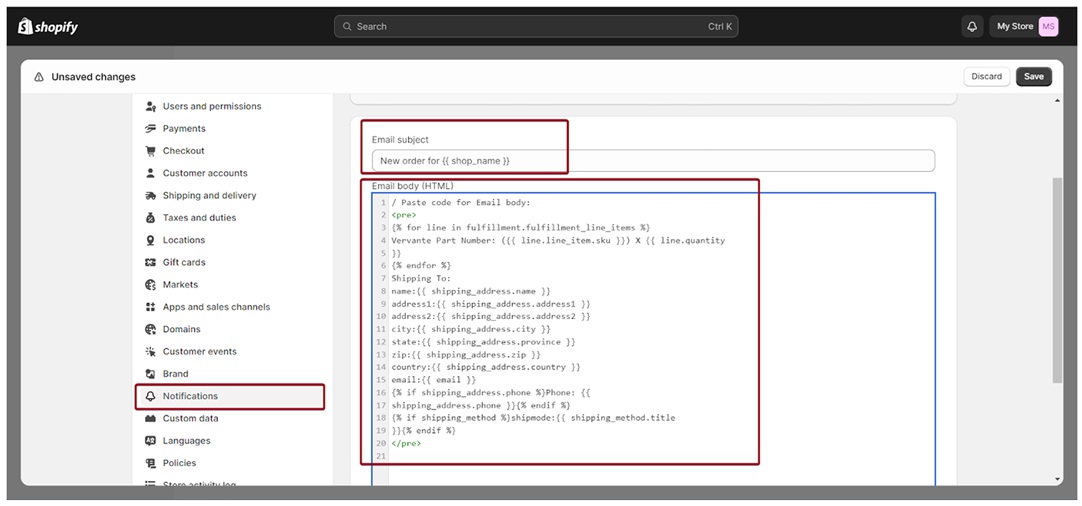
- Go to Settings > Notifications.
- Select Shipping > Fulfillment request.
- Paste the code below into the email subject field.
New order for {{ shop_name }}
- Paste the code below into the email body field.
<pre>
{% for line in fulfillment.fulfillment_line_items %}
Vervante Part Number: ({{ line.line_item.sku }}) X {{ line.quantity }}
{% endfor %}
Shipping To:
name:{{ shipping_address.name }}
address1:{{ shipping_address.address1 }}
address2:{{ shipping_address.address2 }}
city:{{ shipping_address.city }}
state:{{ shipping_address.province }}
zip:{{ shipping_address.zip }}
country:{{ shipping_address.country }}
email:{{ email }}
{% if shipping_address.phone %}Phone: {{ shipping_address.phone }}{% endif %}
{% if shipping_method %}shipmode:{{ shipping_method.title }}{% endif %}
</pre>
Paste this exactly as shown, using straight quotes. If a quote character is changed to a curly quote, the template can fail silently and fulfillment emails will stop sending correctly.
Step 4: Send Fulfillment Requests
Manual
When an order is ready to ship, mark the order as fulfilled from your Shopify admin. That triggers the fulfillment email to us.
Automatic
To automate this, open Settings > Checkout in your admin and review your order fulfillment settings. Shopify's help documentation covers the automatic options in detail.
Shopify updates their interface from time to time, so if a screen looks different from the steps above, check Shopify's current help documentation. If you get stuck at any point, reach out and we will help you get connected.
Looking for other setup help? See Order Processing →